Attaching to PCB test points (the flat pad type) can be done by soldering a small wire to the test point. But manually soldering on a PCB is not for everyone, can be a bit risky and sometimes is not allowed or possible.
I came up with two marvellous high precission engineering PCB test point attaching solutions:
- The ProbeHolder V
- The PogoClip 3000
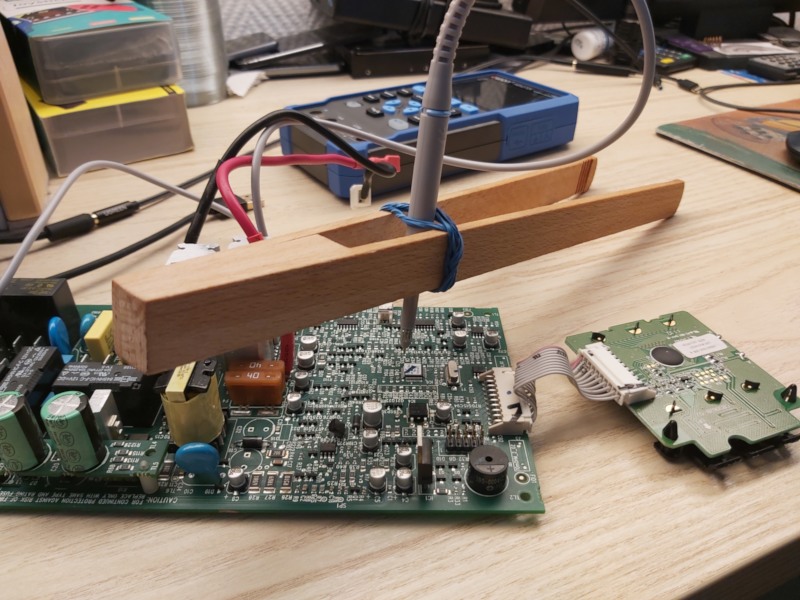
ProbeHolder V
To build the ProbeHolder V you need a wooden grill tong and some rubber band. Wrap the rubber band around the tong close to the handle part multiple times. Then you gently push you oscilloscope probe through the rubber strands. This construction may or may not have been inspired by redicolously high priced commercial oscilloscope probe holders.
Here is a picture:
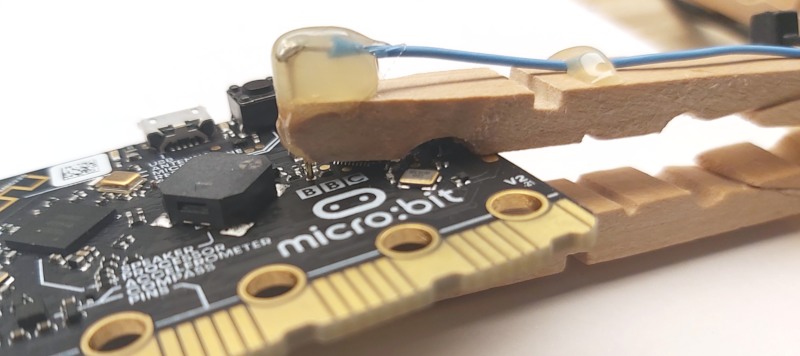
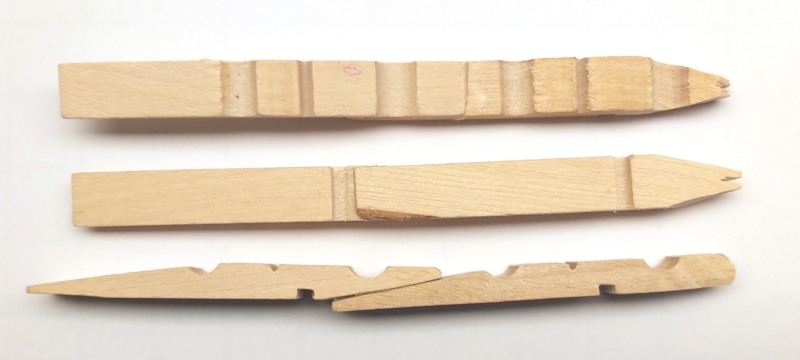
PogoClip 3000
The PogoClip 3000 is a long wooden peg with a pogo pin attached to the tip. I glued two pegs together so that it can be attached to bigger PCBs.
The PogoClip 3000 requires a little bit more effort to build. You need:
- for each clip you want to build, 2 wooden pegs
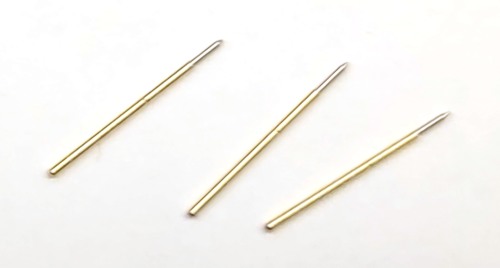
- some ~1mm diameter pogo pins like these:
- wire, soldering iron, solder
- sandpaper
- wood glue
- a hot melt glue gun
Building the PogoClip 3000:
- Sand/cut down the outer front edges of one of the wooden pegs, then glue the second peg half to the first one to make a very long peg.
If you only want short a short PogoClip 2000 version, you can skip this step and just use the peg as is.
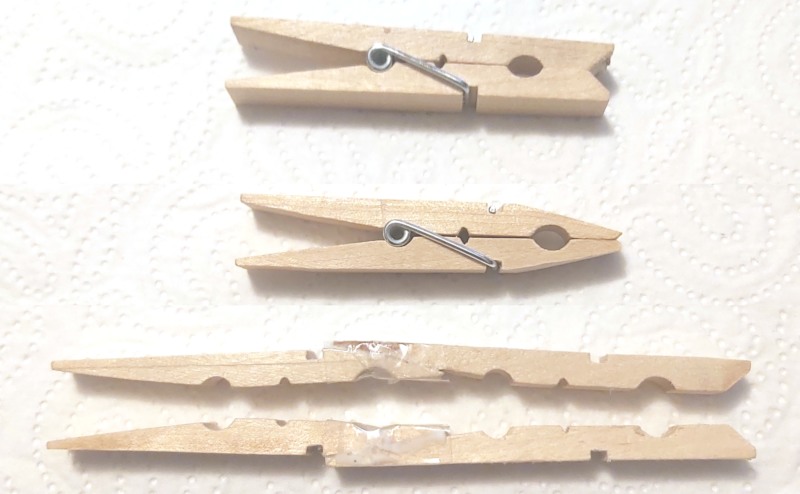
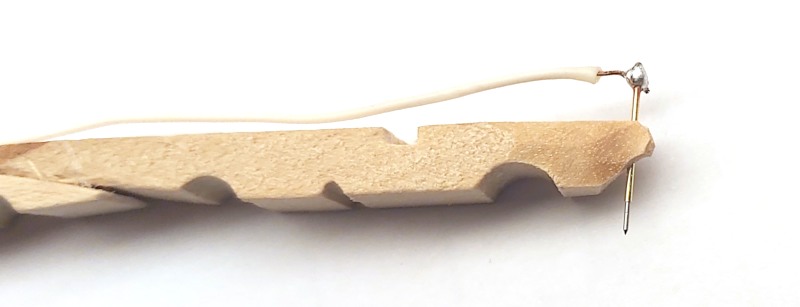
- Remove some wood from the tips of the upper half of the pegs to make the a little bit more slim and cut a small notch into the tip.
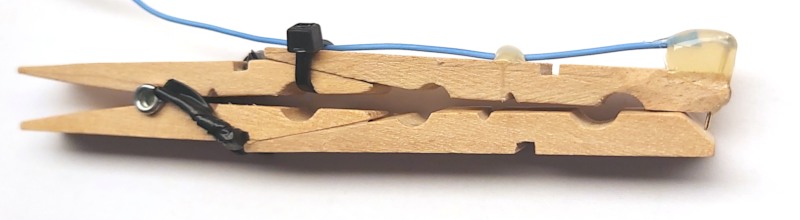
- Solder a wire to the top of a pogo pin and inser the pogo pin into the notch. Use hot melt glue to fix the pogo pin to the peg.
- Assemble with second hald of the peg. Insulate spring with some insulation tape, fix wire with more hot melt glue and/or zip tie.
I started my first electronics project and am in the process of building a USB powered portable microphone pre-amplifier for PC-style electret microphones as they are commonly used in consumer style headsets.
PC style electret microphones are powered by a bias voltage of +5.0V. This voltage is usually supplied by the soundcard on the tip and/or ring of the TRS 3.5mm jack. A good in depth explanation of the different wirings can be found in this article on powering PC microphones. I measured roughly a dozen soundcards (USB and PCI, low end and high end) but unfortunately none of them delivered the full 5V but most only deliver a meager 2.3 to 3V to the mic. This results in low signal levels which then requires amplification (either analog or digital) but that also amplifies noise and sounds bad. Conveniently USB supplies 5V at 200mA which should be enough for an electret mic. My goal is to build a little box that takes USB power and provides a PC style microphone input port on one side and a line-out signal on the other side.
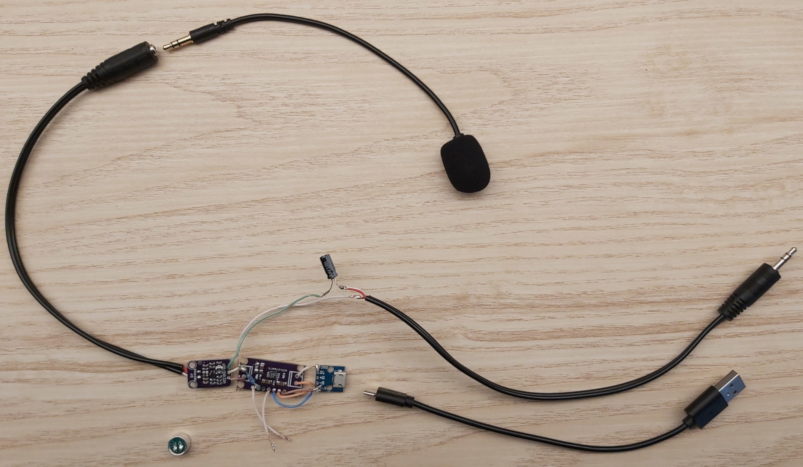
Since I'm an electronics noob I decided to go with breakout boards and chose a MAX4466 based board that is available from a couple of vendors. My idea was to de-solder the electret mic capsule and replace it with a cable connection to a 3.5mm jack port.
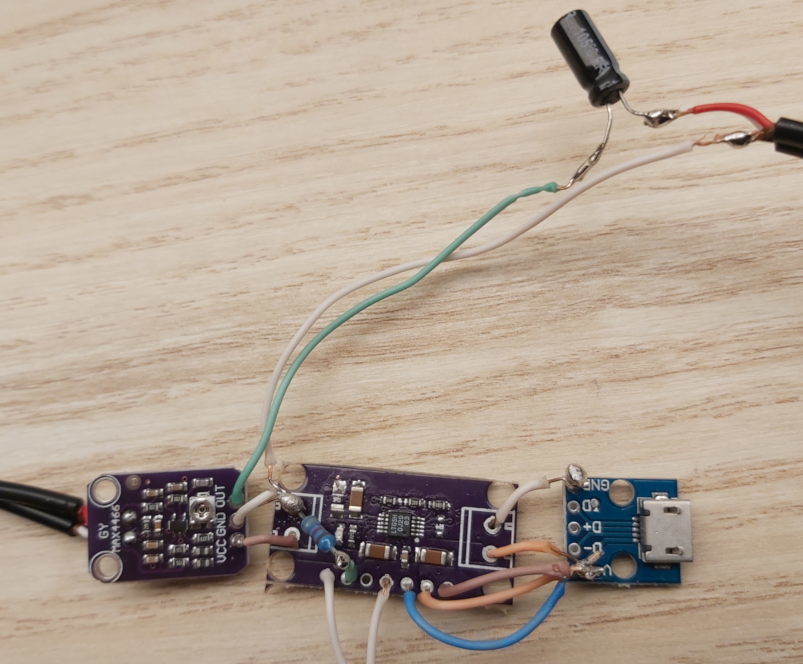
I expected that USB power is noisy. So I put a LT3042 linear voltage regulator (to be precise, a chinese CJMCU-3042) board in front the of the MAX4466 and hoped that it would smooth and filter out the noise from the USB power supply. I had to figure out the board layout and desolder one the of SMD resistors to put in a 48kOhm resistor so that is set to 4.8V instead of the factory 3.3V. To my surprise I got it right and it worked. I will probably make a seperate post with schematics when the project is done. For now, this roughly what I have put together.
                 +--------+          +---------+---------4.8V---> mic in
                 |        |          |         |
    USB 5V-------+ LT3042 +----4.8V--+ MAX4466 |
                 |        |          |         |
                 +--------+          +---------+---------2.4V----||---> line out
                                                                100uF
Surprisingly this whole thing works. I used a TerraTec Aureon 7.1 USB to record the audio because it has a dedicated line in port. This is what I saw on my first recording attempt in Audacity:
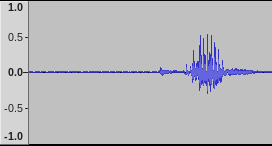
For a cheap 8 EUR microphone on a USB soundcard with a few electronics thrown in, this an acceptably low noise floor with a nice and strong voice signal.
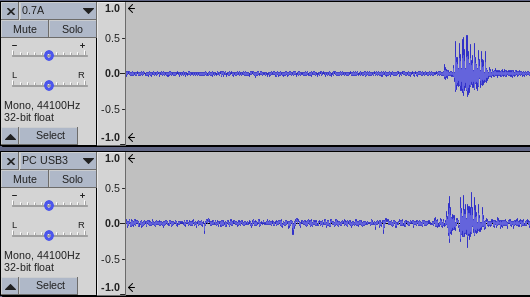
I then kept playing around with all the cables on the desk and for some reason switched the USB power supply from a totally overpowered 4.5A charger to an older 0.7A one. At first I though I had broken something. With that power supply there was an awful noise floor. Then I tried the PC USB3 port and it was even worse. There are rhythmic patterns, hissing and beeping:
I then tested a few more USB charger style power supplies and there are great differences between them. Generally if the USB power supply output was rated above 2.0A, the noise floor was low and clean. USB power supplies below that output rating were much worse.
Keep this in mind when you power RF equipment like WiFi or Bluetooth devices. I subsequently fixed an annoying range problem with a Bluetooth audio dongle by replacing the USB power supply.
Since I want this to work with any USB power, I have to filter out the USB noise and plan to add an LC filter in front of the LDO to remove the high-frequency noise. If this works, I will post updates afterwards.
So I was looking for a nice new kitchen knife and decided to try a chinese cooking knife often called a "Cai Dao" or a cleaver. I decided to get the thinner version that is intended for slicing vegetables and not a butchers cleaver that can be used to cut through bones. I went for the Authentic Blades Cung Slicing M421S since it is a hard carbon steel blade and was available for a nice price from a few sellers in Germany. It is a Vietnamese blade and doesn't have the more flat blade shape that you will find in classic chinese blades like the Chan Chi Kee KF130x series, the Deng/Dengjia GL-3 or the Shibazi S-210 (all of which are carbon steel blades for a very nice price) but it's close enough to give it a try since I never before used a chinese cleaver.
Now this thing is rather big and the woodden knife block I have in my kitchen doesn't have a slot for a cleaver. So where could I store this big knife?
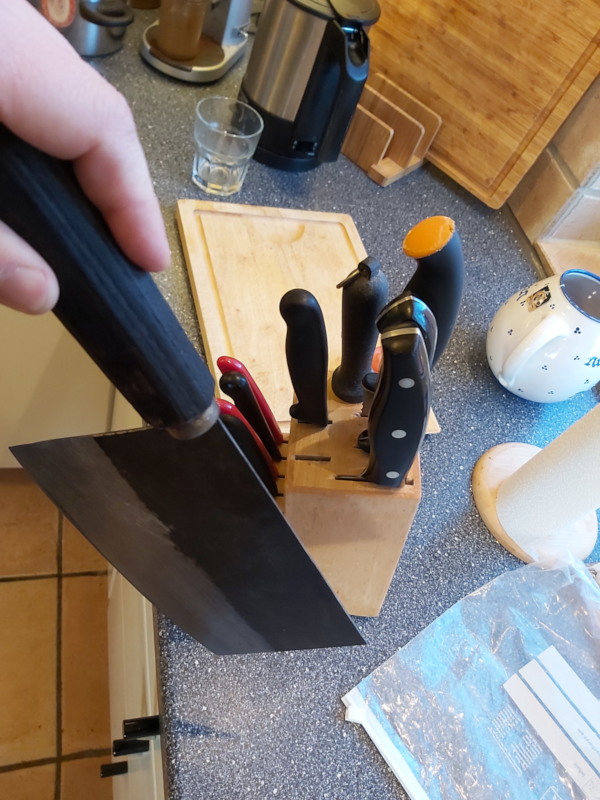
I came up with the idea to stick it to the back of the knife block with some magnets. So I bought some neodymium magnet sticks and glued them to the back of the knife block.
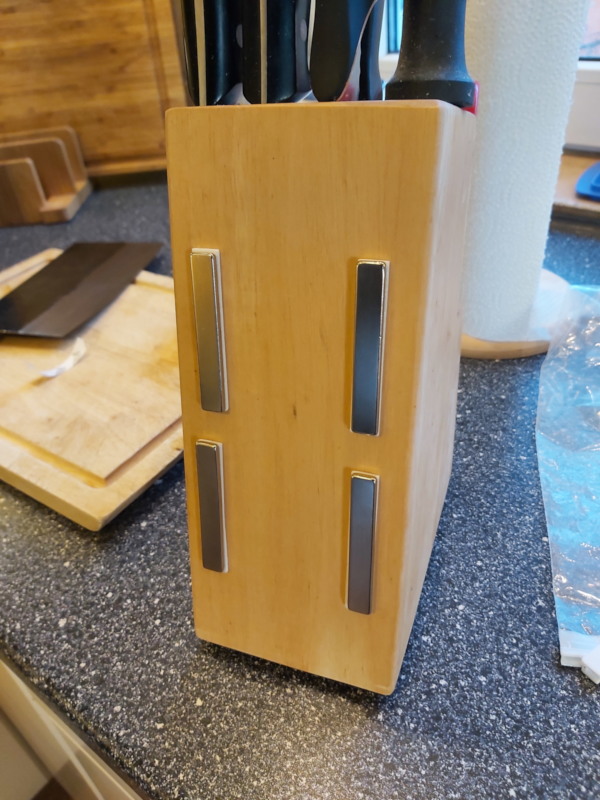
The neodymium magnets are plated with metal and in order to not scratch the surface of the knife when taking it off the magnets I glued some wood veneer onto the magnets. I used bamboo veneer just because I had some leftovers from other woodworking projects but I think you can use any other veneer as well. Just make sure to sand of the edges so that the veneer will not splinter. I used Pattex Kraftkleber Classic as the glue. Other glues will probably work, too. Just make sure to choose one that can stick to metal and wood. It also looks much nicer :)
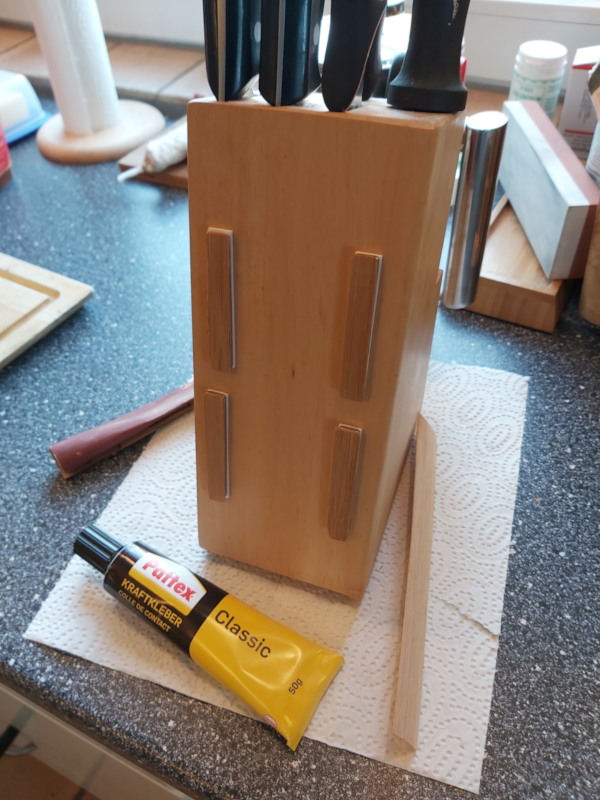
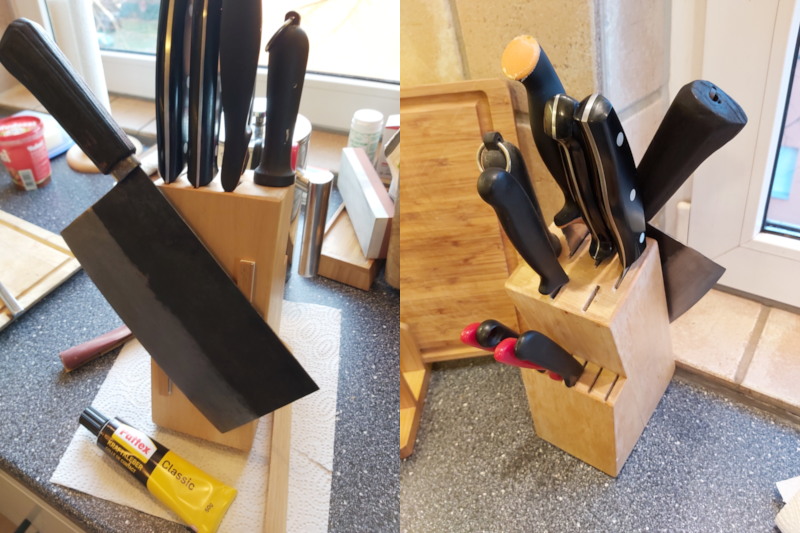
And this is how the end result looks like:
A hobby of mine seems to be authentication protocols. Getting an authentication protocol right is surprisingly hard both in theory and practice. And I like pulling them apart and understanding them.
The Authentication Mechanism Trilemma
As I already wrote in an older blog post about CRAM-MD5, an authentication protocol should fulfill the following non-functional requirements:
- It does not reveal any secret on the communication channel.
- The server stores nothing that would allow an attacker to recover a secret.
- It must be simple to implement.
As said in my CRAM-MD5 post, it seems to be a "choose two" triangle situation (sometimes called a trilemma). Complicated protocols like Kerberos might be good at 1. and 2. but you won't implement it in a day. Asymmetric cryptography also is pretty complicated and requires management of key material by the user.
Plaintext authentication like HTTP BasicAuth or SSH password authentication allows the server to only store strongly hashed secrets (2.) and are simple to implement (3.), but of course the plaintext password goes through the wire (if the underlying encryption channel is protected that may be ok, though).
CRAM-MD5 on the other hand is good at 1. and 3. - It's a challenge-response based mechanism that can be implemented on top of only an existing MD5 implementation in about day - it's not much more then a HMAC on a nonce. But it requires that the server stores the secret that can be used to create the authentication proofs. That stored secret is only an unsalted MD5 hash of the secret - which can easily be reversed nowadays. Using a different hash function won't fix that problem because the specification has no room for salts.
SCRAM
Recently I stumbled upon SCRAM which is a big improvement over CRAM. SCRAM stands for "Salted Challenge Response Authentication Mechanism". It's specified in RFC5802 for SASL and RFC7804 for HTTP. The complexity is low enough that you can reasonably implement it in a few days. All you need is a hash function and a HMAC and PBKDF2 implementation on top of that. HMAC and PBKDF2 are simple enough to implement on your own, if you have to.
Through a few nice crypto tricks SCRAM solves the trilemma (not perfectly, but to some degree).
Key Setup
When the user registers at the server or otherwise sets up a new password, the server derives a client specific StoredKey
and puts it together with some parameters into a database as ServerRecord.
SaltedPassword  := Hi(password, salt, ic)
ClientKey       := HMAC(SaltedPassword, "Client Key")
ServerKey       := HMAC(SaltedPassword, "Server Key")
StoredKey       := H(ClientKey)

ServerRecord    := StoredKey,ServerKey,salt,ic
Let's go through these steps, one by one:
First we calculate SaltedPassword by passing the password through an iterative password hashing function Hi.
The specific function specified here is PBKDF2 with HMAC as the underlying hash function.
It uses the parameters salt which is a user specific random string and ic which is the iteration count.
Then we derive the child keys ClientKey and ServerKey by applying two fixed one-way functions on the parent key SaltedPassword.
These one-way functions are simple HMACs with the known "secrets" "Client Key" and "Server Key".
Everyone who knows SaltedPassword can recreate ClientKey and ServerKey.
But you cannot recover the parent key SaltedPassword from either of the child keys.
This, by the way, is one neat crypto trick to remember. :)
ServerKey is later used by the server to prove to the client that the server knows about the same password as the client.
The ServerRecord is what the server needs to put into its database so that it can later check proofs from clients and issue proofs to clients.
The structure of the key setup is a little key-tree where each branch is a key derivation with a one-way function.
         password    salt,ic
             |         |
             +----+----+
                  |
                  v
       +----SaltedPassword----+
       |                      |
       v                      v
   ClientKey              ServerKey
       |
       v
   StoredKey
Notice how the server only stores one part of the root (salt,ic) and the leafs (StoredKey and ServerKey).
Challenge Response
The next step is to construct a challenge that will be "signed" by both server and client.
To create that challenge the client first sends the server its requested username and a random nonce.
The server in response sends the salt and iteration count ic and another random nonce to the client.
This all together is the AuthMessage:
AuthMessage := username,client-nonce,salt,ic,server-nonce
Then the client creates the proof for the server:
ClientSignature := HMAC(StoredKey, AuthMessage)
ClientProof     := ClientKey XOR ClientSignature
Or as an ascii art drawing:
server  client
 nonce   nonce   username  salt,ic   password
    |      |         |      |  |       |
    +------+----+----+------+  +---+---+
                |                  |
                |                  v
                |            SaltedPassword
                |                  |
                |                  v
                |              ClientKey--+
                |                  |      |
                v                  v      |
           AuthMessage----+----StoredKey  |
                          |               |
                          v               |
                   ClientSignature-------XOR
                                          |
                                          v
                                    ClientProof
The client can recalculate the StoredKey using the salt and ic from the AuthMessage and the original password from the user.
ClientProof is what the client sends to the server. Now when the server receives a proof from a client as ClientProof'
it needs to check it. It does so by also calculating ClientSignature and extracting ClientKey' from the XOR.
ClientKey' := ClientProof' XOR ClientSignature
and then
StoredKey' := H(ClientKey')
Now it can compare StoredKey' to StoredKey and if they match, it knows the client proof is valid.
They brilliant detail here is the construction of ClientProof.
As you can see from the definition above, it's calculated from ClientKey.
But ClientKey must never go over the wire because otherwise an observing attacker could impersonate the client.
To prevent that, it is encrypted by using ClientSignature as an one-time-pad.
Since ClientSignature is a pseudo-random value from an HMAC calculation that depends on at least the client nonce, this should be a perfectly safe encryption.
But why can't we just send the ClientSignature in the first place?
Because when an attacker obtains a ServerRecord from the server it knows the StoredKey and could impersonate the client.
By having the client prove knowledge of the ClientKey, obtaining the StoredKey from the server database is not enough to impersonate the client.
Another way to understanding the mechanism is to think of it as follows:
Like in plaintext authentication, the client shows the password in the form of the directly derived ClientKey to the server.
This allows the server to only store a password hash.
But instead of transmitting the ClientKey over the wire in plaintext, it is encrypted under a session key (ClientSignature) that
is derived from the nonces and the password hash.
Server Proof
For completeness we should continue with the protocol as the server-to-client authentication is still open.
When the client has proven to the server, that it is legitimate, the server must send a ServerSignature to the client:
ServerSignature := HMAC(ServerKey, AuthMessage)
The client can check the ServerSignature by also calculating it from the users password (and salt and ic) and comparing the results.
This could prevent bogus login pages from attackers where the evil server doesn't really check the users password but keeps interacting with the user to trick him into further actions.
';--you have been pwned?
So what can an attacker do with a stolen ServerRecord?
Sadly there is one weakness in the protocol that can easily be spotted (and is also lined out in the RFCs):
If an attacker obtains the StoredKey from the server and learns about the AuthMessage and ClientProof from an authentication exchange,
he can calculate the ClientSignature and subsequently the ClientKey.
Knowing the ClientKey he can then impersonate the client to the server.
Implementation Remarks
I have simplified a few things that are not essential for understanding the basic mechanism but important for getting the implementation conforming and precise. So if you head out to implement SCRAM, go read the RFCs. There are also two issues that are important when implementing authentication protocols in general: timing side-channels and crypto hygiene.
Timing Side-Channels Analysis
If you don't know what a timing side-channel attack is, please read the wikipedia article before going any further. It will be a revelation.
The hash function, HMAC and Hi/PBKDF2 implementation should be constant time. But that's usually the case for even naive implementations.
Another weak point usually are comparisons (memcmp,strcmp) during proof verification.
In particular, when the server compares StoredKey' and StoredKey for equality, a timing side-channel could leak information about the StoredKey.
But for that to work, the attacker has to control StoredKey'.
Since StoredKey' is the hash H(ClientProof' XOR ClientSignature), the attacker has to know ClientSignature to extract any usable information from the timing side-channel.
ClientSignature in turn depends on StoredKey and is unknown to the attacker.
As you can see, SCRAM is so well designed that it makes it hard to mess up and I think it may even be completely resistant to timing side-channel attacks. I would nonetheless make the server side verification comparison constant time, just to be on the safe side. The usual technique to XOR both values and checking the result to be all zeroes should work well since the compared strings are constant length.
Crypto Hygiene
Another best practice in crypto implementations is to overwrite secrets with zeroes as soon as they are not needed anymore. This protects against local attackers who may be able to observe memory. In the days of Spectre attacks this is relevant more then ever.
Specifically the ClientKey' that is calculated on the server during verification is something that should be deleted as quickly as possible.
While you are at that, know your tools - a simple memset is not enough.
It is not trivial to overwrite memory that is not used afterwards because compilers may consider that useless writes and optimize them away.
Recovering from a Database Breach
Another aspect that is possible with SCRAM is to recover from a database breach.
When an attacker has stolen the ServerRecords, that doesn't mean the users password needs to be changed.
It only means that the ClientKey and ServerKey need to be replaced.
In order to do that, you need multiple ServerRecords for one user and store all but one in a safe place (like an offline/write-only database).
So if you have a breach and have cleaned up the mess, you can pull out one of the spare ServerRecords for the users from the offline database
and you and your users are safe again without users having to change their passwords.
For that to be safe, you have to make sure to use a different salt for every user and ServerRecord.
The Authentication Trilemma Solution
So how does SCRAM solve the "chose two" trilemma from above.
I think you could say that it trades in a little bit of 1. for a lot of 2. .
By transferring the encrypted ClientKey to the server, the server learns about ClientKey
and in case of a previous database breach an attacker can also learn about ClientKey.
In return the server can store strongly hashed passwords in the form of StoredKey which require costly brute force attacks to crack.
I think this is a good trade-off.
Regular expressions are handy. Who hasn't written a quick and dirty "parser" here or there that just throws a regex at some input and checks if it matches. In most modern languages there are builtin regex tools with excellent features and of good quality. In C/C++ things are a little more difficult.
You can use the shiny new regex library from the C++11 standard if your compiler supports it, or you can use Boost.Regex. Both are ... let's call it "surprisingly complex". And on top of it, the runtimes are of varying quality.
Also, sometimes you can only use C which would then force you to use another external library.
But there is an alternative. If you have worked with regexes more deeply, you will know that they basically are tiny programs in a weird programming language. The regex engine is the interpreter. Some regex engines are even interpreters with an optimizing JIT compiler. But ... if you can compile stuff during runtime, you can also compile it ahead of time - given you know the program at compile time.
So if you have a fixed regex in your program, there should be tools that can compile your regex into executable code. One such tool is re2c.
re2c is a code generator that takes a bunch of regular expressions and generates a C function that you can compile and call. This can be used for writing the lexer stage in a parser/compiler and thus re2c is also sometimes called a lexer generator. But this is nothing else then a more fancy regex compiler. So let's have a look at an example.
Given this C++ program with re2c annotations:
enum Token {
  TK_None,
  TK_PositiveDecimal,
  TK_NegativeDecimal
};

Token regex_match_decimal(const char *YYCURSOR) {
    const char *YYMARKER;

    /*!re2c
        re2c:define:YYCTYPE = char;
        re2c:yyfill:enable = 0;

        end = "\x00";
        dec = [0-9]+;
        sign = "-";

                   * { return TK_None; }
             dec end { return TK_PositiveDecimal; }
        sign dec end { return TK_NegativeDecimal; }
    */
}
re2c will generate this lexer:
/* Generated by re2c 1.0.2 on Mon Oct  9 20:41:14 2017 */
enum Token {
  TK_None,
  TK_PositiveDecimal,
  TK_NegativeDecimal
};


Token regex_match_decimal(const char *YYCURSOR) {
    const char *YYMARKER;


{
  char yych;
  yych = *YYCURSOR;
  switch (yych) {
  case '-': goto yy4;
  case '0':
  case '1':
  case '2':
  case '3':
  case '4':
  case '5':
  case '6':
  case '7':
  case '8':
  case '9': goto yy5;
  default:  goto yy2;
  }
yy2:
  ++YYCURSOR;
yy3:
  { return TK_None; }
yy4:
  yych = *(YYMARKER = ++YYCURSOR);
  switch (yych) {
  case '0':
  case '1':
  case '2':
  case '3':
  case '4':
  case '5':
  case '6':
  case '7':
  case '8':
  case '9': goto yy6;
  default:  goto yy3;
  }
yy5:
  yych = *(YYMARKER = ++YYCURSOR);
  switch (yych) {
  case 0x00:    goto yy9;
  case '0':
  case '1':
  case '2':
  case '3':
  case '4':
  case '5':
  case '6':
  case '7':
  case '8':
  case '9': goto yy11;
  default:  goto yy3;
  }
yy6:
  yych = *++YYCURSOR;
  switch (yych) {
  case 0x00:    goto yy13;
  case '0':
  case '1':
  case '2':
  case '3':
  case '4':
  case '5':
  case '6':
  case '7':
  case '8':
  case '9': goto yy6;
  default:  goto yy8;
  }
yy8:
  YYCURSOR = YYMARKER;
  goto yy3;
yy9:
  ++YYCURSOR;
  { return TK_PositiveDecimal; }
yy11:
  yych = *++YYCURSOR;
  switch (yych) {
  case 0x00:    goto yy9;
  case '0':
  case '1':
  case '2':
  case '3':
  case '4':
  case '5':
  case '6':
  case '7':
  case '8':
  case '9': goto yy11;
  default:  goto yy8;
  }
yy13:
  ++YYCURSOR;
  { return TK_NegativeDecimal; }
}

}
What you can see is that:
- The generated code doesn't need a runtime.
- The generated code is just raw C.
- It's a simple statemachine implementation.
If you like that, have a look at the manual and examples on re2c.org. In the latest versions it even supports utf-8, push matchers and a bunch of compiler extensions to generate even faster matchers.